Enter your keyword

Showing posts with label Tricks. Show all posts

REMEMBERING YOUR USB STICK

By On 12:32
Well, most of us have that annoying and potentially disastrous habit of leaving USB memory sticks plugged into computers when  we are on travel. But there is solution for this, USBalert. Its a handy application that warns us if memory stick is still plugged in when we try to shut down PC.

Don't forget, we need to run the application every-time we plug our USB stick in, but its worth the few second it takes, especially if we carry important or sentimental data on our USB memory stick. the application USB alert,we can get it from www.usbalert.nl .With this software we can't forget our USB stick anymore. It sounds and shows an alarm if we lock or shutdown our computer while the USB stick is still connected. 


REPAIR YOUR DETECTABLE BUT CORRUPT USB DRIVE

By On 11:26
Have you suddenly encountered with the problem that when you plug in your USB drive, the Removable media shows up but when you try to open it, it returns with the message:
Please insert a disk in to drive H:
If yes then this tutorial will help you. By applying this simple method you'll have 75% chance to get back your USB drive hardware. This works only in the above error condition. If the window doesn’t detect your USB drive, then there is probably flaw in the USB media.

NOTE: Please keep in mind that, you'll have to lose your data when following this tutorial.

> Plug in your USB drive.

> Go to Start - 'My Computer', right click on 'My Computer' icon and click on 'Manage' menu. Computer Management window will pop up.

> Click on 'Disk management' under 'Storage' tree menu

> Now at the right side of the window right click on your removable media, right click on your removable media and choose 'Change Drive Letter and Paths.'

> Now in new window choose any drive letter that is not taken by any media (M: , N: , :K: etc.)

> Click on 'OK' button and close the management window. Try opening your USBdrive. There may be the chance to have your USBdrive recovered if this method worked.

> If the problem still prevails then follow the above tutorial but instead of choosing Change drive letter and paths, choose 'Format' and give a quick format to it.

> Now you'll have finally lost your data but the USBdrive is safe in your hands.

Hope this tutorial was working. If it didn’t please do comment me. I will find other solutions as well.

LOCK AND MAKE FOLDER SIZE ZERO KB WITHOUT SOFTWARE

By On 11:43

Here is one trick from that you can make folder of size 0KB and this
can't be deleted.

Following are the some steps for it:

> Make new folder and rename it as 'personal'

> Copy any size of data and paste inside the folder

> Open notebook and type 'cacls personal /e /p everyone:n' (without qouts).

> Save it as lock.bat

> Again open new notepad and type 'cacls personal /e /p everyone:f '

> Save it as unlock.bat

NOTE: Remember that Both .bat file should save in the same directory of the folder name 'personal'

> After of all just run lock.bat file and you can see that our 0KB folder is ready.

> For the unlock you can unlock it by running unlock.bat file.


This folder neither delete any one after running lock.bat nor rename it.

You can hide your both bat files

GET FASTER BOOT UP

By On 15:27

Yes you can get faster boot up, just need to follow some simple ways and you can decrease the time it takes to start up your computer in Windows by minutes in some cases. With just a few tweaks, you can get your boot up time down to 30 seconds and not 20 minutes. These are some quick and easy tips for faster boot up times.

>: Eliminate Start-up Delay
To get faster boot up speeds, you can cut the boot delay to 0. The delay is in place to allow your startup processes some breathing room during loading. Your default delay is 30 seconds. So, you can eliminate it for faster boot up times.
1. Open your Start menu.
2. Click Run
3. In the command screen, type msconfig
4. In the system configuration utility, click either BOOT tab.
5. In the boot menu, change the default setting for the Time Out from 30 to 5 seconds.

                                         > Organize your Hard Drive 
If you are looking for something in a messy room, naturally, it’s going to take you longer to find something. This is a good metaphor for a hard drive. Over time, filing system gets disorganized. Periodically, you need to reorganize this filing system on your hard drive. Luckily, Windows has a good utility called Defrag that will put your system in order.
1.Open the Start Menu
2. Click on My Computer
3. Right Click your C: drive or your hard drive image.
4. Scroll down to the Click Properties
5. In the Properties Menus, Open the “Tools” menu.
6. Choose Defragment.
7. In the Disk Defragment menu. Click on Defragment Disk

> Remove Excess Startup Programs 
Most programs you add to your computer will opt to load when you startup your computer. Eventually you will rack up a load of programs that kill faster boot times. You need to reduce the startup programs. You can easily disable unnecessary startup programs. Here is how:
1. Open your Start menu.
2. Click Run
3. Type msconfig, click Enter
4. In the system configuration utility,click either services or startup tab.
5. Uncheck all programs that your are no longer want to run in the background.
6. Click OK

> Hard Disk Check Up
 Over time, your hard drives gets degraded both physically and digitally. It’s important to monitor your drives health. An error or damaged sector can throw software loading into an infinite loop causing long load times. To check your drive health:
1. Click Start
2. Choose Computer
3. Right Click your Hard Drive
4. Choose Properties, Go to 'Tools' tab
5. Click Check Drives Health. After, the check up gives you repair options or a clean bill of health.
6. Restart to get a faster boot up.

Really easy, try it and enjoy.

SPEED UP YOUR PC VIRTUALLY

By On 09:45
This one is epic but very helpful so to speed up your windows or to increase RAM virtually,

Right click on My Computer
>> Properties
>> Advanced
>> Performance - Settings
>> Advanced
>> Virtual Memory - Change


Keep the initial size same as recommended and maximum size double of it then restart your system.
It will improve speed of windows and you can play some games which require higher RAM.

When a window is active, press the F11 key of the keyboard to get the biggest window possible and press F11 again to restore it.

Try it and enjoy.

ABORT SHUTDOWN, PRESSED MISTAKENLY

By On 09:34
How To Abort the Shutdown Operation In Windows?
In some cases, the shut down or a restart button of the computer is pressed mistakenly. In such cases, this operation can be easily aborted. Here are the steps:

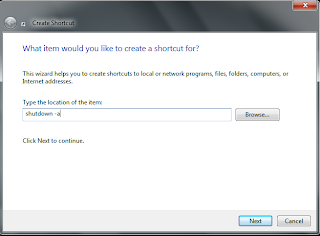
> Press the right button of the mouse on the clean area of the desktop and then choose “shortcut” under “New”


 > Write “shutdown -a” under “type the location of the item” and click next.
> Now give the shortcut name of your choice and click on finish.
> With this the abort operation icon is ready. Now whenever, you click on the shutdown or restart button, then immediately press this icon and the operation is aborted.

Easy and simple try it very helpful.

OVERCOMING FILE (dll and ocx) LOST OR NOT FOUND

By On 12:15

SPEED UP YOUR HARD DISK SPEED[READ AND WRITE]

By On 14:01
To speed up your hard disk speed means, its read and write speed. For this we need to configure a special buffer in the computer’s memory in order to enable it to better deal with interrupts made from the disk. This tip is only recommended if you have 256MB RAM or higher. 
 
Follow these steps:
1. Open Run Command –> Start – >RUN

2. Type SYSEDIT.EXE This will open system editor window Expand the system.ini file window. Scroll down almost to the end of the file till you find a line called [386enh]. Press Enter to make one blank line, and in that line type Irq14=4096

Note: 
This line IS CASE SENSITIVE! Click on the File menu, then choose Save. Close SYSEDIT and reboot your computer Done. Speed improvement will be noticed after the computer reboots.

Extra Points:  
The most speed improvement is visible with IDE drives; however there are reports that this tweak also does good for SCSI disks. In any case, it won’t harm your system, so don’t worry to try it.

Popular